CLICK HERE FOR FREE BLOGGER TEMPLATES, LINK BUTTONS AND MORE! »

Sunday, December 5, 2010

Tinkerbell Cake


This is the finished cake with the topper from the tutorial:) It's done all in buttercream with the gumpaste/fondant accents. The top is a 6" double on a 10" double giving it a tall tiered look. This paticular cake will feed 35-40 people.

Here is a better photo of the topper. You can see that I added the rainbow Disco dust everywhere, giving it that sparkle. Oh, I mean fairy dust:)
Any questions,things you would like to see here, or just say hi!; just email me:)
Have a great week!

Wednesday, December 1, 2010

Something New!

I am now offering molded chocolates! You can use these for cake and cupcake toppers, as well as party favors. I can make lollipops or pencil pops for parties or teacher's gifts. I will be showing the gifts I will be making for my kid's teachers plus my daughter's upcoming fundraiser. I will need a two week notice in case I need to order the molds. Who doesn't love chocolate!!!

Monday, November 29, 2010

Tinkerbell Topper Tutorial

I worked on a flower topper this weekend. It measures a little over 5" wide, but I'm not sure how tall. If it helps, the white circle it is sitting on is a 6" round cake board. Things tend to start out small and get bigger as I go:) The theme is Tinkerbell. Gotta love those fairies! I love the movies and couldn't for the longest time, understand why. It's the colors! They have the most vibrant colors and I love all the flowers and butterflies. Funny my boys weren't all that impressed..Oh well on to work.
The first step was to make petals. I made these using the Wilton flower veining disk, I guess that's what you would call it:) I rolled out a small amount with my roller, cut a 2.5" circle then placed it on my disk. Using my most valuable tool I own, my fingers, I gently pressed and pushed outwards. This forms a very nice petal.

After this process, I gently laid it across petal drying formers, curling the edges for a more realistic look. I let these dry overnight and then added them to my base.

My base consists of a small wooden dowel to place into the cake and then green leaves peeking from beneath.You ask, where's the stick at? I use an upside down flower pot for my work surface:) On this base, I began adding the dried petals, each one securing it with "sugar glue" or meringue powder mixed with water. I tried to keep in mind the way a flower unfolds to make it the most realistic I could. I then add a small amount of the pink to secure my center too.

Notice how I have some tissue paper underneath some of the petals. This is because I added them later and I wanted them to dry standing up.

I had to modify this plastic Tinkerbell cupcake topper to adhere to my gumpaste flower. Plastic will not stick to the gumpaste alone. I had to cover it, plus I didn't like the plastic little flower she was sitting on:)

Here is the before and after of the modification. I also added some glitter to her wings for some extra sparkle.

I applied sugar glue to the surface I was adhering to. You must always use glue to stick two gumpaste surfaces together. Lesson Learned:)

Firmly pressing the center down, I wiggle and push, till I get a firm placement.

I let this dry overnight again and will come back and add edible glitter to the petals. I just heard the UPS guy knock on my door with the glitter! I love those guys, it's like Christmas when they come:)Oh and I will also add some orange and brown dust to the center for a more realistic look.
I hope you go away with something from this little tutorial. If anything, to remember to put lotion on your hands before taking up close pictures of them:)
Have a great week!

Thursday, November 25, 2010

Happy Thanksgiving!

Wishing everyone a safe and happy holiday! May you gobble till you wobble or eat so much, they have to carry you out on a stretcher:)

I will be working on some upcoming cakes this weekend, so check back!

Have a great day!
Tiffany

Thursday, November 18, 2010

Gobble Till Ya Wobble!


This photo came out a little dark:( These were some quick little turkeys I made for some Thanksgiving cakes. He measured about 4" tall and is all gumpaste. I have started using styrafoam on my bigger items. I think this is better than the Rice Krispie Treats and alot lighter weight. I will be working on a Tinkerbell cake next weeks as well as another orange monkey. This time he is holding balloons. Should be fun! So check back.

Well, it's been a busy week in sugar land and I'm tired. Have a great weekend!

Wednesday, November 17, 2010

Ladybug Cake


This is a ladybug cake I did last week. The large bug measures 6" around! I covered a styrafoam ball w/gumpaste then added the head the next day. Super Easy! I will do all my large props and figures this way from now on. The black number one is 50/50 gumpaste and fondant on a large skewer to hold the weight. There are five bees on wires floating on top. The daisies are gumpaste and royal icing. Melynda did a wonderful job matching the green and I loved the daisy petals peeking from underneath.

Well, off to take the boys to school! Have a great day!

Friday, November 12, 2010

Halloween Cupcake Toppers


Toppers for Fall cupcakes. They measure about 1" and are made of 100% gumpaste.
I do these in quantities of 12 or a dozen:)I plan on making some for Christmas too, so check back often for those pictures.

Have a safe and wonderful Thanksgiving!

Thursday, October 28, 2010

Harley Davidson


There's nothing that screams "I am Man hear me Roar" than this! The flames were made seperate. The plague or emblem is lying on top. This is so she can place the flames wherever she likes. I used yellow tinted gumpaste and dusted the edges with orange and red. This gives it a good blend and nice contrast with the white cake. The emblem was all hand cut, yes each letter (what was i thinking, huh?).

Crazy to think you could pick this up and eat it huh? Yummmo! Not! She ordered 48 letters too to place on cupcakes. Each cupcake will have an "HD" on it. Can't wait to see the pictures!
Well gotta run!

Friday, October 15, 2010

Leo the Lion

Leo is 100% gumpaste and about 3.5" tall by 3" around. He was a heavy little booger too! Of course the mane was the tedious part of the whole thing. I tried using the clay extruder for the hair but my gumpaste was so soft, it just was too gooey:( Lesson I learned about heavily colored gumpaste: Let it sit for several hours before using it. This helps it become more stiff for handling.

My son couldn't help but touch him so he lost a toe too. I just scraped off the squished toe and replaced it with fresh dough. Lesson: Always have extra gumpaste made for accidents or breakage.

Have A Great Day!

Thursday, October 14, 2010

Orange Monkeys Topper


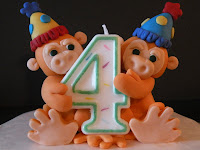
This is for a cake for twin boys. She wanted two twin monkeys holding a number four candle. They measure 3" high and are 100% edible.

My challenge is always making a solid structure. I have tried using Rice Krispie Treats, thinking it would make them lighter weight. Not the case at all! I think they are just as heavy. Plus I can't stand the lumpiness:(

These were made in 3 days. Yes, you have to have lots of patience. This works well for me because I am usually having to stop and go get kids or referee a wresting match:)
I will get into details of construction when I have more time.

Bye for now!

Here We go!

The first post in my new blog! I hope you enjoy my creations and that they inspire you in your own cake decorating. I also, hope to find others who enjoy this art as well.
If I have a lot of requests, I may show tutorials on how I did something. Four children may get in the way of that though!We will see.